How Nango built an open source unified API platform?
Published: Tue Sep 12 2023
Let’s find out what a unified API platform is and how Nango built one in this byte!
Say you need to integrate multiple OAuth providers (Google and GitHub for simplicity) to provide seamless authorization into your application. What will you do?
- You’ll visit Google’s and GitHub’s documentation to follow the steps to integrate
- You’ll create credentials (id and secret) and use them for authorization
- Maybe you’ll install npm packages specific to Google and GitHub or use client libraries for API calls
- And dealing with access and refresh tokens
To simplify the above steps (though you need to follow step 2), a unified API platform exists. What this unified platform does is that it will act as a proxy (a middleman between your application and OAuth providers), which will take care of authorization (in this case).
Also, a unified platform will unify the methods for authorization and fetching data. For example, you may use different methods to authorize users and fetch data from, let’s say, Google and GitHub. Here’s how the code for authorization looks if you use a unified API platform like Nango:
// Google
nango.auth('google', '<user-id>');

// GitHub
nango.auth('github', '<user-id>');
How did Nango build one?
In simple words as said before, Nango server acts as a middleman which will take care of authorization and also fetching data (which is explained in the sync section). I don’t want to create another Nango documentation because they have a better one. Instead, I would like to explain by digging into Nango’s codebase.

Alright, first things first. You can find the providers.yaml file where all the information about an external API is defined. Here is how it is for GitHub:
github:
  auth_mode: OAUTH2
  authorization_url: https://github.com/login/oauth/authorize
  token_url: https://github.com/login/oauth/access_token
  proxy:
    base_url: https://api.github.com
  docs: https://docs.github.com/en/rest
Keep the ‘providers.yaml’ file in mind; we will come to this later. Here are a few lines of code that you’ll define in your web application (React) for the GitHub OAuth provider:
import Nango from '@nangohq/frontend';
import { useNavigate } from 'react-router-dom';

const nango = new Nango({ publicKey: 'f12xxxxx-xxxx-xxxx-xxxx-xxxxxxxxx83b' });

nango
	.auth('demo-github-integration', 'test-connection-id')
	.then((result) => {
		navigate('/dashboard');
	})
	.catch((err) => {
		console.error(err);
	});
To understand how auth works in Nango, it’s important to understand the structure of the codebase. The functionalities are well structured as packages. Here is how the packages directory is structured:
packages
	cli
	frontend
	node-client
	server
	shared
	webapp
	worker
We’re going to focus on the frontend package because the nango class is imported from there. Here is what happens when you call the auth method with provider and connectionId:
- An
urlwill be constructed with the arguments passed with theauthmethod, which will hit the server (default to nango cloud) - A Promise is created with success and error handlers. This is passed to the AuthorizationModal constructor, which will open a modal with an url
- The server will route this request to OAuthController.oauthRequest
- The method will get the callbackurl using the getOauthCallbackUrl function, which will look to your integrations (Nango cloud) using the
environmentId - Now the appropriate template (GitHub) will be fetched from the
providers.yamlfile, which consists ofauthorization_url, etc - Depending on the
auth_mode(OAUTH1, OAUTH2), oauth1Request or oauth2Request will be called. For GitHub, theauth_modeis OAUTH2 - Nango uses Simple OAuth2 under the hood to simplify the OAuth 2.0 authorization process. A client (simpleOAuthClient) is created. When calling the method simpleOAuthClient.authorizeURL, it will create an
urlthat the user will be redirected to in order to initiate the OAuth 2.0 authorization process - The res.redirect(authorizationUri) line of code is used to initiate the OAuth 2.0 authorization process. When this code is executed, it redirects the user’s browser (in this case, the model) to the authorizationUri, which is the GitHub page where the user can log in (if not already logged in) and grant or deny permission to your application
- The communication between the client and server will be handled using web sockets
Note: All the processes above will take place inside a popup model.
So this is how the authorization works when using Nango.
Managing Access Tokens
I thought that the access_token could be fetched from the Nango server to your backend and passed to the client, which can be stored in the local storage. But here is the statement from Mr. Bastien, co-founder of Nango:
Nango is meant to sync data between your backend to external APIs. So normally you wouldn’t have to send the credentials to the frontend.
This means that the access-token can be fetched from the Nango server to your backend and used there to fetch data from external websites.
Proxy Requests
There are two options to fetch data from external APIs:
- By Nango server (Proxy Requests) or
- By managing yourself from your own backend
Proxy Requests are nothing but the GET and POST API requests which will be managed by Nango server itself, because it has access tokens which can be used for data fetching. Say you need to show the issues created by the user; then you should fetch issues from the GitHub API, isn’t it? Nango will take care of fetching the data.
For example, I used the below code to fetch the repos from my GitHub account.
import { Nango } from '@nangohq/node';

const start = async () => {
	const nango = new Nango({ secretKey: 'f12xxxxx-xxxx-xxxx-xxxx-xxxxxxxxx83b' });

	const res = await nango.proxy({
		method: 'GET',
		endpoint: '/user/repos',
		providerConfigKey: 'demo-github-integration',
		connectionId: 'test-connection-id',
		headers: {
			'content-type': 'text/plain'
		},
		retries: 5,
		baseUrlOverride: 'https://api.github.com'
	});

	console.log(res.data);
};

start();
Let’s see what the proxy method does. The proxy method constructs an url in the format ${this.serverUrl}/proxy${config.endpoint[0] === '/' ? '' : '/'}${config.endpoint} and hits the constructed url with the desired HTTP methods. In my case, the url would be https://api.nango.dev/proxy/user/repos.
Let’s shift the focus to the server package. The requests from the proxy route get routed to the ProxyController class, and the method routeCall gets called. Here is what the routeCall method does:
- The appropriate template will be fetched to know the proxy url.
- An url is constructed by calling the method constructUrl in order to fetch the desired results.
- A request will be sent to an external API (GitHub in this case) with the appropriate HTTP method, and the response will be returned to the client by the Nango server.
Nango Sync
In the above section I mentioned that there are two options for data fetching. But there is a third option which is known as Sync. Sync will import data continously in the background in a periodic manner. Let’s dig into the codebase to understand how Sync works! Before that, read this guide on creating a Sync.
If you read the guide, you will come to understand that according to the configuration defined in the YAML, the CLI will generate .ts scripts that contain methods to fetch data. I am able to track up to the endpoint /sync/deploy, which calls the method deploySync. This method then calls another function getAndReconcileSyncDifferences which saves the syncs in the database with logic to avoid duplication. After this point, I am not able to track the code further. I suspected a worker would read the syncs from the database and run them periodically. I reached out to Mr. Bastien for clarification, and here are the words from him:
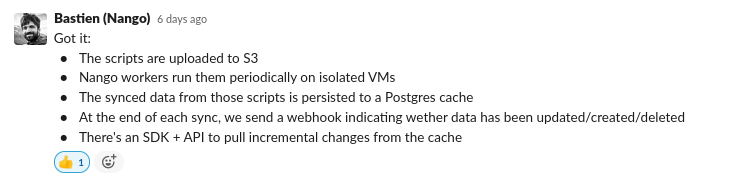
You can dig into the worker package to get to know more. It uses the temporal service under the hood.
We’ve come to the end of this byte. I hope you’ll get a deeper understanding of the workings of Nango. Thanks to Mr. Bastien for answering my queries, which helped in the writing of this byte.